DIY Siding Installation: What You Need to Know Before You Start. Transforming your home’s exterior with new siding is a rewarding project, but success hinges on thorough preparation. This guide navigates you through the essential steps, from meticulous planning and budget allocation to selecting the right materials and mastering the installation process. We’ll cover everything from understanding building codes and permits to tackling common challenges and ensuring a professional-looking finish. Get ready to embark on a journey to a beautifully sided home!
This comprehensive guide provides a step-by-step approach to successfully completing a DIY siding installation. We’ll explore crucial aspects like budgeting, material selection, tool requirements, surface preparation, installation techniques, and post-installation maintenance. By following our detailed instructions and addressing potential obstacles proactively, you can confidently undertake this project and achieve impressive results.
Project Planning & Budgeting
Successfully installing new siding involves meticulous planning and a realistic budget. Underestimating costs is a common pitfall leading to project delays and financial strain. This section details the cost breakdown, budgeting strategies, and accurate measurement techniques crucial for a smooth DIY siding installation.
Initial Cost Breakdown
The initial investment in a DIY siding project encompasses several key areas: materials, tools, and potential permits. Material costs vary significantly based on the siding type (vinyl, wood, fiber cement, etc.), quantity needed, and chosen style. Tool costs depend on whether you already own necessary equipment. Permitting fees, if required, add another layer of expense. Accurate estimation of these costs is paramount for avoiding unexpected financial burdens.
| Cost Category | Estimated Cost Range | Notes |
|---|---|---|
| Siding Materials | $2,000 – $10,000+ | Depends on house size, siding type, and quality. Consider extra for waste. |
| Underlayment/Sheathing | $500 – $2,000 | Required for proper installation and moisture protection. |
| Fasteners & Accessories | $100 – $500 | Nails, screws, flashing, J-channels, etc. |
| Tools (Rental or Purchase) | $100 – $1,000+ | Ladder, measuring tape, circular saw, nail gun (rental recommended for beginners). |
| Permits | $0 – $500+ | Check local building codes; permits may not be required for minor repairs. |
| Safety Equipment | $50 – $150 | Safety glasses, gloves, dust mask, fall protection. |
Sample Budget Spreadsheet
A well-structured budget spreadsheet helps manage expenses and anticipate potential overruns. The following example demonstrates a simple format incorporating contingency for unexpected costs and potential savings strategies.
| Item | Estimated Cost | Actual Cost | Difference | Savings Strategies |
|---|---|---|---|---|
| Siding Materials | $3000 | Shop around for best prices, consider purchasing in bulk. | ||
| Underlayment | $750 | Utilize reclaimed materials where appropriate (check local building codes). | ||
| Fasteners | $200 | Buy in bulk to reduce per-unit cost. | ||
| Tools (Rental) | $250 | Rent tools only when needed, return promptly. | ||
| Permits | $100 | Check for permit discounts or waivers. | ||
| Contingency (10%) | $425 | Set aside funds for unforeseen issues. | ||
| Total Estimated Cost | $4725 |
Accurate Area Measurement
Precise measurement of the area requiring siding is fundamental for accurate material ordering and cost estimation. Inaccurate measurements lead to material shortages or surpluses, impacting both project timeline and budget.
A step-by-step guide ensures accurate measurements:
- Divide the house into sections: Break down the house’s exterior into manageable sections (walls, gables, etc.).
- Measure each section’s height and width: Use a measuring tape to record the dimensions of each section. Account for windows and doors by measuring their dimensions separately.
- Calculate the area of each section: Multiply the height and width of each section to determine its area. Subtract the areas of windows and doors from the total wall area.
- Add up the areas of all sections: Sum the areas of all sections to determine the total area requiring siding.
- Add extra for waste: Add 5-10% to the total area to account for cuts, waste, and potential errors.
- Verify measurements: Double-check all measurements to ensure accuracy before purchasing materials.
Accurate measurement is crucial. A 10% error in measurement can significantly impact material costs and project success.
Choosing the Right Siding Material
Selecting the right siding material is a crucial decision in any home improvement project, significantly impacting the aesthetic appeal, durability, and overall cost of your home. The choice depends on a variety of factors, including your budget, climate, desired maintenance level, and architectural style. This section will explore the properties of various siding materials to help you make an informed decision.
Siding Material Comparison
The following table compares the properties of common siding materials: vinyl, wood, fiber cement, and metal. Understanding these differences is key to selecting the best option for your home.
| Siding Material | Durability | Maintenance | Cost |
|---|---|---|---|
| Vinyl | High; resistant to rot, insects, and moisture. Can withstand harsh weather conditions for many years with minimal damage. | Low; typically requires only occasional cleaning. | Moderate; generally less expensive than wood or fiber cement. |
| Wood | Moderate to high; depending on the type of wood and treatment. Susceptible to rot, insects, and moisture damage if not properly maintained. | High; requires regular painting or staining, and potential repairs due to weathering or pest damage. | High; typically more expensive than vinyl, but less than fiber cement in many cases. |
| Fiber Cement | Very high; highly resistant to fire, rot, insects, and moisture. Offers excellent durability and longevity. | Moderate; requires periodic painting or staining, but less frequently than wood. | High; generally the most expensive option. |
| Metal | Very high; highly resistant to fire, rot, insects, and moisture. Extremely durable and long-lasting. | Low; requires minimal maintenance, typically just occasional cleaning. | Moderate to High; cost varies greatly depending on the type of metal (e.g., aluminum, steel, zinc) and finish. |
Factors Influencing Siding Color and Style Selection
Choosing the right siding color and style is essential for enhancing your home’s curb appeal and complementing its architectural design. Several factors should be considered during this process. For example, a traditional home might benefit from classic clapboard siding in earth tones, while a modern home might be better suited to sleek, horizontal panels in neutral colors. The surrounding landscape and neighborhood style also play a significant role in determining appropriate color palettes and design elements. Consider the impact of natural light on the siding color throughout the day; a color that appears vibrant in the afternoon sun might look dull in the morning. Finally, consulting with a professional designer can provide valuable insights and help you make the best choices for your home.
Necessary Tools and Equipment
Successfully installing siding requires the right tools and equipment. Having everything prepared beforehand will streamline the process, improve efficiency, and minimize the risk of accidents or delays. Proper tools also ensure a professional-looking finish. This section outlines the essential tools and equipment needed, along with safety considerations.
The tools and equipment required for DIY siding installation can be broadly categorized into measuring and marking tools, cutting tools, fastening tools, and safety equipment. The specific needs might vary slightly depending on the type of siding you choose, but this list covers the essentials for most projects.
Essential Tools and Equipment
Gathering the correct tools is crucial for a smooth and safe siding installation. The following list details the essential tools, their functions, and their importance in the process. Remember to check the condition of your tools before starting the project; dull or damaged tools can lead to inaccurate cuts and potentially dangerous situations.
- Measuring Tape: Accurate measurements are fundamental for proper siding placement and cutting. A long tape measure (at least 25 feet) is recommended for larger projects.
- Level: Ensures that the siding is installed straight and plumb, preventing a lopsided or uneven appearance. A 4-foot level is generally sufficient, but a longer level might be helpful for larger walls.
- Chalk Line: Used to create straight lines on the wall, serving as a guide for consistent siding placement. This helps maintain uniformity and alignment throughout the installation.
- Circular Saw with Fine-Tooth Blade: Used for cutting siding materials to size. A fine-tooth blade minimizes chipping and ensures clean, precise cuts, especially important for materials like vinyl or fiber cement.
- Jigsaw: Useful for cutting intricate shapes or making cuts in tight spaces where a circular saw is difficult to maneuver. This is particularly helpful when working around corners or windows.
- Hammer: Essential for driving nails or siding fasteners securely into place. A claw hammer is versatile and allows for the removal of misplaced nails.
- Nail Gun (Optional but Recommended): Significantly speeds up the installation process and provides consistent fastener placement. Using a nail gun requires proper training and safety precautions.
- Safety Glasses: Protect your eyes from flying debris during cutting and fastening. Always wear safety glasses, even for seemingly simple tasks.
- Work Gloves: Protect your hands from splinters, cuts, and abrasions. Choose gloves that offer good dexterity and protection.
- Ladder: Necessary for reaching higher areas of the wall. Ensure the ladder is stable and properly positioned before climbing. Use a ladder that extends beyond the work area for safe access.
- Putty Knife: Useful for applying caulk or sealant around windows and doors, creating a weather-tight seal.
- Utility Knife: Helpful for trimming excess materials and making small adjustments during installation. A sharp blade ensures clean cuts.
- Screwdriver (various sizes): Useful for assembling certain siding components or securing accessories. Have a variety of sizes on hand to accommodate different fasteners.
Safety Precautions and Personal Protective Equipment (PPE)
Safety should be the top priority during any DIY project. Ignoring safety precautions can lead to serious injuries. The following points highlight essential safety measures and PPE required for safe siding installation.
- Always wear safety glasses to protect your eyes from flying debris. Dust masks are also recommended, especially when working with certain siding materials.
- Use work gloves to protect your hands from cuts and splinters. Heavy-duty gloves are recommended when handling sharp materials.
- Use appropriate hearing protection if using power tools, especially a nail gun. Prolonged exposure to loud noises can damage your hearing.
- Ensure proper ladder safety. Always use a stable ladder that extends beyond the work area. Never overreach while on a ladder.
- Be aware of electrical lines and take precautions to avoid contact. Call your local utility company to mark the location of underground lines before starting the project.
- Follow the manufacturer’s instructions for the specific siding material you are using. This will ensure proper installation and prevent damage to the siding.
- Take breaks to avoid fatigue, which can lead to accidents. Working safely is more important than working quickly.
Preparing the Surface
Proper surface preparation is crucial for a successful siding installation. A well-prepared surface ensures the new siding adheres properly, lasts longer, and provides a professional, finished look. Neglecting this step can lead to problems such as poor adhesion, gaps, and premature siding failure. This section details the necessary steps to prepare your existing wall for new siding.
Removing Old Siding
Removing existing siding can be labor-intensive but is often necessary for a complete and lasting installation. The method depends on the type of siding being removed. For instance, wood siding may require careful prying and removal of nails, while vinyl siding typically comes off in panels. Always wear appropriate safety gear, including gloves and eye protection. Dispose of old siding responsibly, following local regulations for waste disposal.
Cleaning the Surface
Once the old siding is removed, thoroughly clean the wall surface. Use a pressure washer to remove dirt, loose paint, cobwebs, and other debris. Pay close attention to areas where mold or mildew may have accumulated. A solution of water and a mild detergent can be used to scrub stubborn stains. Allow the surface to dry completely before proceeding to the next step. A clean surface ensures optimal adhesion of the new siding and primer.
Repairing Damaged Areas
Inspect the wall for any damage, such as cracks, holes, or rotting wood. Repair any damage before installing the new siding. For minor cracks, patching compound may suffice. Larger holes or damaged areas might require replacing sections of sheathing or applying a reinforcing mesh before applying patching compound. Ensure all repairs are thoroughly dry and level before proceeding. This step is vital for a structurally sound and aesthetically pleasing final result. For example, a rotted section of wood should be cut out and replaced with treated lumber before patching.
Ensuring a Level and Plumb Surface
A level and plumb surface is essential for proper siding alignment and a professional appearance. Use a level and plumb bob to check the wall’s surface. Any significant deviations from level or plumb need to be addressed before siding installation. This might involve shimming uneven areas or installing furring strips to create a consistent surface. Take precise measurements and ensure all adjustments are made securely. For instance, if a section of wall is bowed outward, furring strips can be strategically placed to create a straighter plane for the siding.
Applying Primer
Once the surface is clean, repaired, and level, apply a primer specifically designed for exterior use and compatible with your chosen siding material. Priming helps to seal the surface, improve adhesion, and provide a uniform base for the new siding. Apply the primer evenly, following the manufacturer’s instructions. Allow the primer to dry completely before installing the new siding. This step enhances the longevity and appearance of the finished project. For example, using an oil-based primer on wood siding will provide superior protection against moisture and rot.
Installing the Siding
With the surface prepared, you’re ready to begin the actual siding installation. This process requires careful attention to detail to ensure a watertight, aesthetically pleasing, and long-lasting finish. Remember to always consult your chosen siding manufacturer’s instructions for specific guidance, as installation methods can vary slightly depending on the material.
Starting the Installation
Begin installation at a corner of the house, typically the most visible one, to ensure a clean and consistent start. This allows you to work your way around the building, maintaining a uniform appearance. For horizontal siding, start at the lowest point, working upwards. For vertical siding, begin at one end of a wall and work across. Establish a level starting line using a chalk line to ensure consistent spacing and alignment throughout the project. The first piece of siding should be precisely positioned and secured to establish a benchmark for all subsequent pieces.
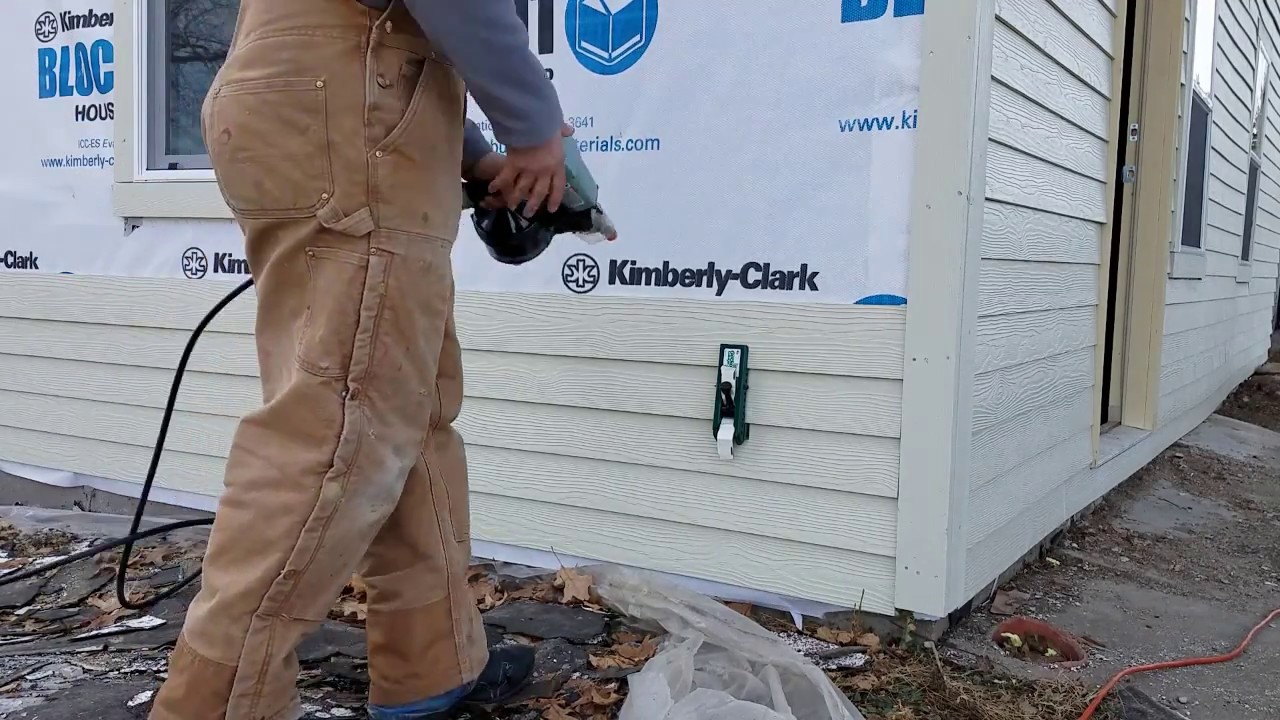
Overlapping and Fastening Techniques
Proper overlapping is crucial for preventing water penetration. The amount of overlap will depend on the type of siding and manufacturer’s instructions. Generally, horizontal siding overlaps from the bottom piece to the top piece. Vertical siding will overlap from one piece to the next, working from left to right or vice-versa. Use galvanized nails or screws specifically designed for your siding material. These fasteners should be driven in straight to avoid splitting the siding. Avoid overdriving the fasteners, as this can damage the siding and compromise its integrity. The recommended spacing for fasteners will be indicated on the siding manufacturer’s instructions; typically, this is between 6 to 8 inches apart.
Installing Corners
Corner pieces are specifically designed to provide a neat and weather-resistant finish at exterior corners. These pieces are typically installed before the main siding panels. They are usually pre-mitered or require cutting to achieve a precise 45-degree angle for a seamless fit. Secure these corner pieces using appropriate fasteners, following the manufacturer’s recommendations for spacing and penetration depth. Ensure that the corner pieces are plumb and aligned before fastening to create a sharp and visually appealing corner.
Installing Around Windows and Doors
Siding installation around windows and doors requires precise measurements and cuts. Use a utility knife or specialized siding cutter for clean cuts. J-channel is often used to create a neat transition between the siding and the window or door trim. Install the J-channel first, ensuring it is properly aligned and secured. Then, install the siding panels, carefully fitting them into the J-channel. Proper flashing should be installed behind the J-channel to prevent water penetration. The same approach is used for door installations, ensuring a watertight seal around the frame.
Achieving a Professional Finish
Maintaining consistent spacing between siding panels is key to achieving a professional look. Use spacers to ensure uniform gaps. Accurate cuts and precise alignment are crucial. Use a level and measuring tape frequently to ensure everything is straight and plumb. Always follow the manufacturer’s instructions for your specific siding material. Regularly check your work to ensure the alignment and spacing remain consistent throughout the entire installation. A consistent overlap and precise cuts will dramatically improve the final look. Clean up any debris or excess materials as you work to maintain a neat and tidy workspace.
Dealing with Obstacles and Challenges
DIY siding installation, while rewarding, presents several potential challenges. Understanding these obstacles beforehand and having strategies to overcome them is crucial for a successful project. Proper planning and preparation are key to minimizing disruptions and ensuring a professional-looking finish.
Even the most meticulous planning can’t account for every eventuality, but being prepared for common issues will greatly reduce stress and frustration. This section will address some of the most frequently encountered problems and offer practical solutions.
Uneven Walls
Uneven walls are a common issue that can significantly complicate siding installation. Variations in wall surface can lead to gaps, misaligned panels, and an overall unprofessional appearance. To address this, careful measurement and adjustment are necessary. Before installing the siding, use a level to identify the high and low points of the wall. For minor imperfections, shims can be strategically placed behind the siding to create a level surface. For more significant irregularities, consider furring strips, which are thin pieces of lumber attached to the wall to create a consistent plane for the siding. This creates a new, even surface for the siding to be installed on. Remember to use appropriate fasteners to secure both the furring strips and the siding.
Difficult Corners and Tricky Areas
Corners, windows, and doors present unique challenges. Precise cutting and careful fitting are essential to ensure a seamless and watertight seal. Pre-fabricated corner pieces are readily available for many siding types and simplify the process considerably. For areas around windows and doors, accurate measurements and careful cutting are crucial. Using a sharp utility knife or jigsaw and taking your time will yield better results. Remember to always follow the manufacturer’s instructions for proper installation around these features. Proper flashing is crucial to prevent water infiltration in these vulnerable areas.
Adverse Weather Conditions
Weather can significantly impact siding installation. Extreme heat can cause materials to expand and become difficult to work with, while rain or high winds can damage materials and compromise the installation. Always check the weather forecast before beginning the project and schedule your work for days with favorable conditions. Ideally, work should be done on days with mild temperatures, low humidity, and no precipitation. If unexpected weather arises, immediately protect unfinished work with tarps or other appropriate coverings. Never attempt to install siding in wet or windy conditions.
Troubleshooting and Preventing Mistakes
Preventing mistakes starts with careful planning and preparation. Double-checking measurements, using appropriate tools, and following manufacturer’s instructions are vital steps. If problems arise during installation, such as damaged siding or misaligned panels, it’s often best to remove and replace the affected sections rather than attempting to force a solution. Patience and attention to detail are key to avoiding costly mistakes and ensuring a quality finish. Remember, taking your time and focusing on precision will lead to a better outcome. Don’t rush the process.
Finishing Touches and Trim
Completing your DIY siding installation involves more than just attaching the panels. Adding trim and carefully sealing all joints are crucial steps that ensure a professional-looking finish and protect your home from the elements. Properly installed trim enhances the aesthetic appeal and provides additional weather protection. Caulking is essential to prevent water intrusion, which can lead to costly repairs down the line.
The final stages of siding installation focus on meticulous detail work to create a durable and attractive exterior. This includes installing various trim pieces, such as corner boards, J-channel, and window and door casings, and applying a high-quality sealant to all seams and joints. Careful attention to these details will significantly impact the longevity and appearance of your new siding.
Installing Trim Pieces
Installing trim pieces requires precision and attention to detail. Corner boards, for instance, should be mitered at a 45-degree angle to create a clean, seamless corner. J-channel is used to finish the edges of the siding and provide a neat transition to other building materials. Window and door casings should be carefully measured and cut to fit snugly around the openings. Using a level ensures that all trim is installed straight and plumb, contributing to a professional finish. For example, when installing a corner board, pre-drilling pilot holes will prevent splitting the wood and ensure a secure fastening. Accurate measurements are crucial for a neat fit, minimizing gaps and ensuring a watertight seal.
Caulking and Sealing
Caulking is a critical step in preventing water damage. All joints and seams between siding panels, trim pieces, and other building materials should be carefully caulked using a high-quality exterior-grade sealant. This sealant acts as a barrier against moisture, preventing water from penetrating the wall system and causing rot or mold. For example, gaps around windows and doors are particularly vulnerable to water intrusion and require thorough caulking. Choosing a sealant with good adhesion and flexibility is important to ensure a long-lasting seal that can withstand expansion and contraction due to temperature changes. A bead of caulk should be applied smoothly and evenly, ensuring complete coverage of the joint.
Cleaning Up and Waste Disposal
Cleaning up the work area and disposing of waste materials responsibly is the final, but equally important, step. All debris, including scraps of siding, nails, and packaging materials, should be carefully collected and disposed of properly. Local regulations regarding waste disposal should be followed. For example, some communities have specific guidelines for the disposal of construction waste, such as requiring separate collection of wood and metal scraps. Proper cleanup prevents potential hazards and ensures a safe and tidy work environment. Furthermore, responsible waste disposal helps to protect the environment.
Understanding Building Codes and Permits
Before you even pick up a nail, understanding and adhering to local building codes and obtaining the necessary permits is crucial for a successful and legal siding installation project. Ignoring these regulations can lead to significant problems, including fines, project delays, and even the need for costly rework. This section will guide you through the process of navigating building codes and permits, ensuring your project proceeds smoothly and legally.
Building codes are sets of rules and regulations designed to ensure the safety, structural integrity, and overall quality of buildings. These codes vary by location, reflecting local climate conditions, building materials commonly used, and other specific factors. They often address aspects relevant to siding installation, such as the type of siding allowed, its proper installation methods, and fire safety requirements. Obtaining the necessary permits demonstrates your commitment to adhering to these regulations and protects both you and your property.
Navigating the Permitting Process
The permitting process typically involves several steps. First, you’ll need to identify the relevant authority, usually your local building department or a similar agency. Their website or a phone call will provide information on required forms, application fees, and any necessary supporting documentation. This documentation may include detailed plans of your project, specifying the type of siding, its dimensions, and the areas where it will be installed. You will then submit your application and relevant documents. The building department will review your application to ensure it meets all the local codes and regulations. This review process can take some time, so it’s best to apply well in advance of your intended start date. Once approved, you will receive your permit. Remember to keep the permit on-site during the project and make it available for inspection by building officials.
Potential Consequences of Non-Compliance
Failure to obtain the necessary permits or to adhere to building codes can result in several negative consequences. These can include:
- Fines: Significant fines can be levied for violations, potentially exceeding the cost of the permits themselves.
- Stop-Work Orders: The building department may issue a stop-work order, halting your project until the violations are corrected.
- Project Rejection: In severe cases, the entire project may be rejected, requiring extensive rework and potentially leading to demolition.
- Increased Insurance Premiums: Non-compliance can affect your homeowner’s insurance, leading to higher premiums or even policy cancellation.
- Liability Issues: If your non-compliant siding installation causes damage or injury, you could face significant legal liability.
“Obtaining the necessary permits and adhering to building codes is not just a legal requirement; it’s a crucial step in ensuring the safety and longevity of your home improvement project.”
Maintenance and Repair
Proper maintenance is crucial for extending the lifespan of your newly installed siding and preserving its aesthetic appeal. Regular inspections and timely repairs will prevent minor issues from escalating into costly replacements. This section details how to maintain your siding and address common problems.
Regular cleaning and prompt attention to damage are key to keeping your siding looking its best and performing optimally. Neglecting maintenance can lead to premature deterioration and reduce the overall value of your home.
Siding Cleaning and Inspection
Maintaining your siding involves regular cleaning and visual inspections. A thorough cleaning, ideally twice a year (spring and fall), removes dirt, debris, and mildew that can accumulate over time. Use a soft-bristled brush and a pressure washer (low-pressure setting) to clean the siding gently. Avoid harsh chemicals, as they can damage the siding material. During these cleanings, carefully inspect the siding for any signs of damage, such as cracks, dents, loose pieces, or discoloration. Note the location and severity of any damage found for future repair. A yearly more detailed inspection in the fall is recommended to prepare for winter weather.
Repairing Common Siding Issues
Several common issues can arise with exterior siding. Cracks are often caused by impact or settling. Small cracks can be repaired with a high-quality exterior-grade caulk matched to your siding color. Larger cracks may require patching or section replacement. Dents, usually from impact, can often be carefully popped back into place, although deep dents might need to be filled with an appropriate filler before repainting. Loose pieces of siding indicate a problem with the underlying fastening. Check the nails or screws securing the siding. If loose, gently re-nail or screw them, ensuring they are securely fastened. If the damage is extensive, professional help may be required. For example, a section of vinyl siding that has become severely warped or damaged from a storm may need to be replaced entirely. Similarly, extensive wood rot requires professional remediation and replacement.
Creating a Maintenance Schedule
A regular maintenance schedule ensures your siding remains in top condition. The following schedule provides a guideline:
| Task | Frequency |
|---|---|
| Visual Inspection for Damage | Monthly |
| Cleaning (Soft Brush and Water) | Quarterly |
| Thorough Cleaning (Pressure Washer – Low Pressure) and Detailed Inspection | Twice Yearly (Spring and Fall) |
| Professional Inspection (for wood siding) | Every 5 Years |
This schedule is a suggestion and may need to be adjusted based on your climate, siding material, and the presence of trees or other environmental factors that might impact your siding. For example, areas with heavy tree cover may require more frequent cleaning to remove accumulated leaves and debris.
Assessing Your DIY Capabilities
Undertaking a DIY siding installation project requires a realistic assessment of your skills and experience. Successfully completing this project involves a range of skills, from accurate measurements and cutting to working at heights and understanding building codes. An honest self-evaluation is crucial to avoid costly mistakes, potential injuries, and project delays.
This section will outline the importance of self-assessment and provide guidance on when professional help is necessary. We will also offer resources for finding qualified siding installers should you decide to outsource all or part of the project.
Factors to Consider When Evaluating DIY Feasibility
Before beginning your project, consider your experience with home improvement projects, your comfort level working at heights, and your access to the necessary tools and equipment. A complex house design, significant areas of damaged siding, or the need to work around intricate architectural details can significantly increase the difficulty and complexity of the installation. Consider projects you’ve completed in the past. Have you successfully tackled projects requiring similar precision and attention to detail? If not, hiring a professional might be the safer and more efficient approach.
Situations Warranting Professional Assistance
There are several situations where hiring a professional siding installer is strongly recommended. These include projects involving significant structural issues, complex designs, working with unusual materials, or when dealing with significant heights or difficult-to-access areas. For example, if your home has multiple stories or intricate architectural features like dormers or bay windows, the added complexity might outweigh the benefits of a DIY approach. Similarly, if your existing siding is severely damaged or rotten, requiring extensive repairs before installation, professional expertise is advisable. Furthermore, working with specialized siding materials, such as fiber cement or metal, often requires specific knowledge and tools best handled by experienced professionals. Finally, safety should always be a primary concern. If you are uncomfortable working at heights or lack experience with power tools, it’s best to leave the job to professionals.
Resources for Finding Qualified Siding Installers
If you determine that professional help is needed, several resources can assist in finding qualified siding installers. Online directories, such as those provided by home improvement websites or local business directories, can provide a list of installers in your area. Check online reviews and ratings to gauge the quality of their work and customer service. Word-of-mouth referrals from friends, family, or neighbors who have recently had siding installed can also be valuable. Finally, contacting your local building department can provide you with a list of licensed and insured contractors in your area. Remember to always check licensing and insurance information before hiring any contractor to ensure they are qualified and legally compliant.
Ending Remarks
Successfully completing a DIY siding installation is a testament to careful planning, meticulous execution, and a commitment to detail. From initial budgeting and material selection to the final finishing touches, each step contributes to the overall success of the project. Remember to prioritize safety, adhere to building codes, and don’t hesitate to seek professional assistance when needed. With thorough preparation and a systematic approach, you can transform your home’s exterior and enjoy the satisfaction of a job well done. Your newly sided home awaits!