Plant Selection for a Low-Maintenance Luxurious Garden
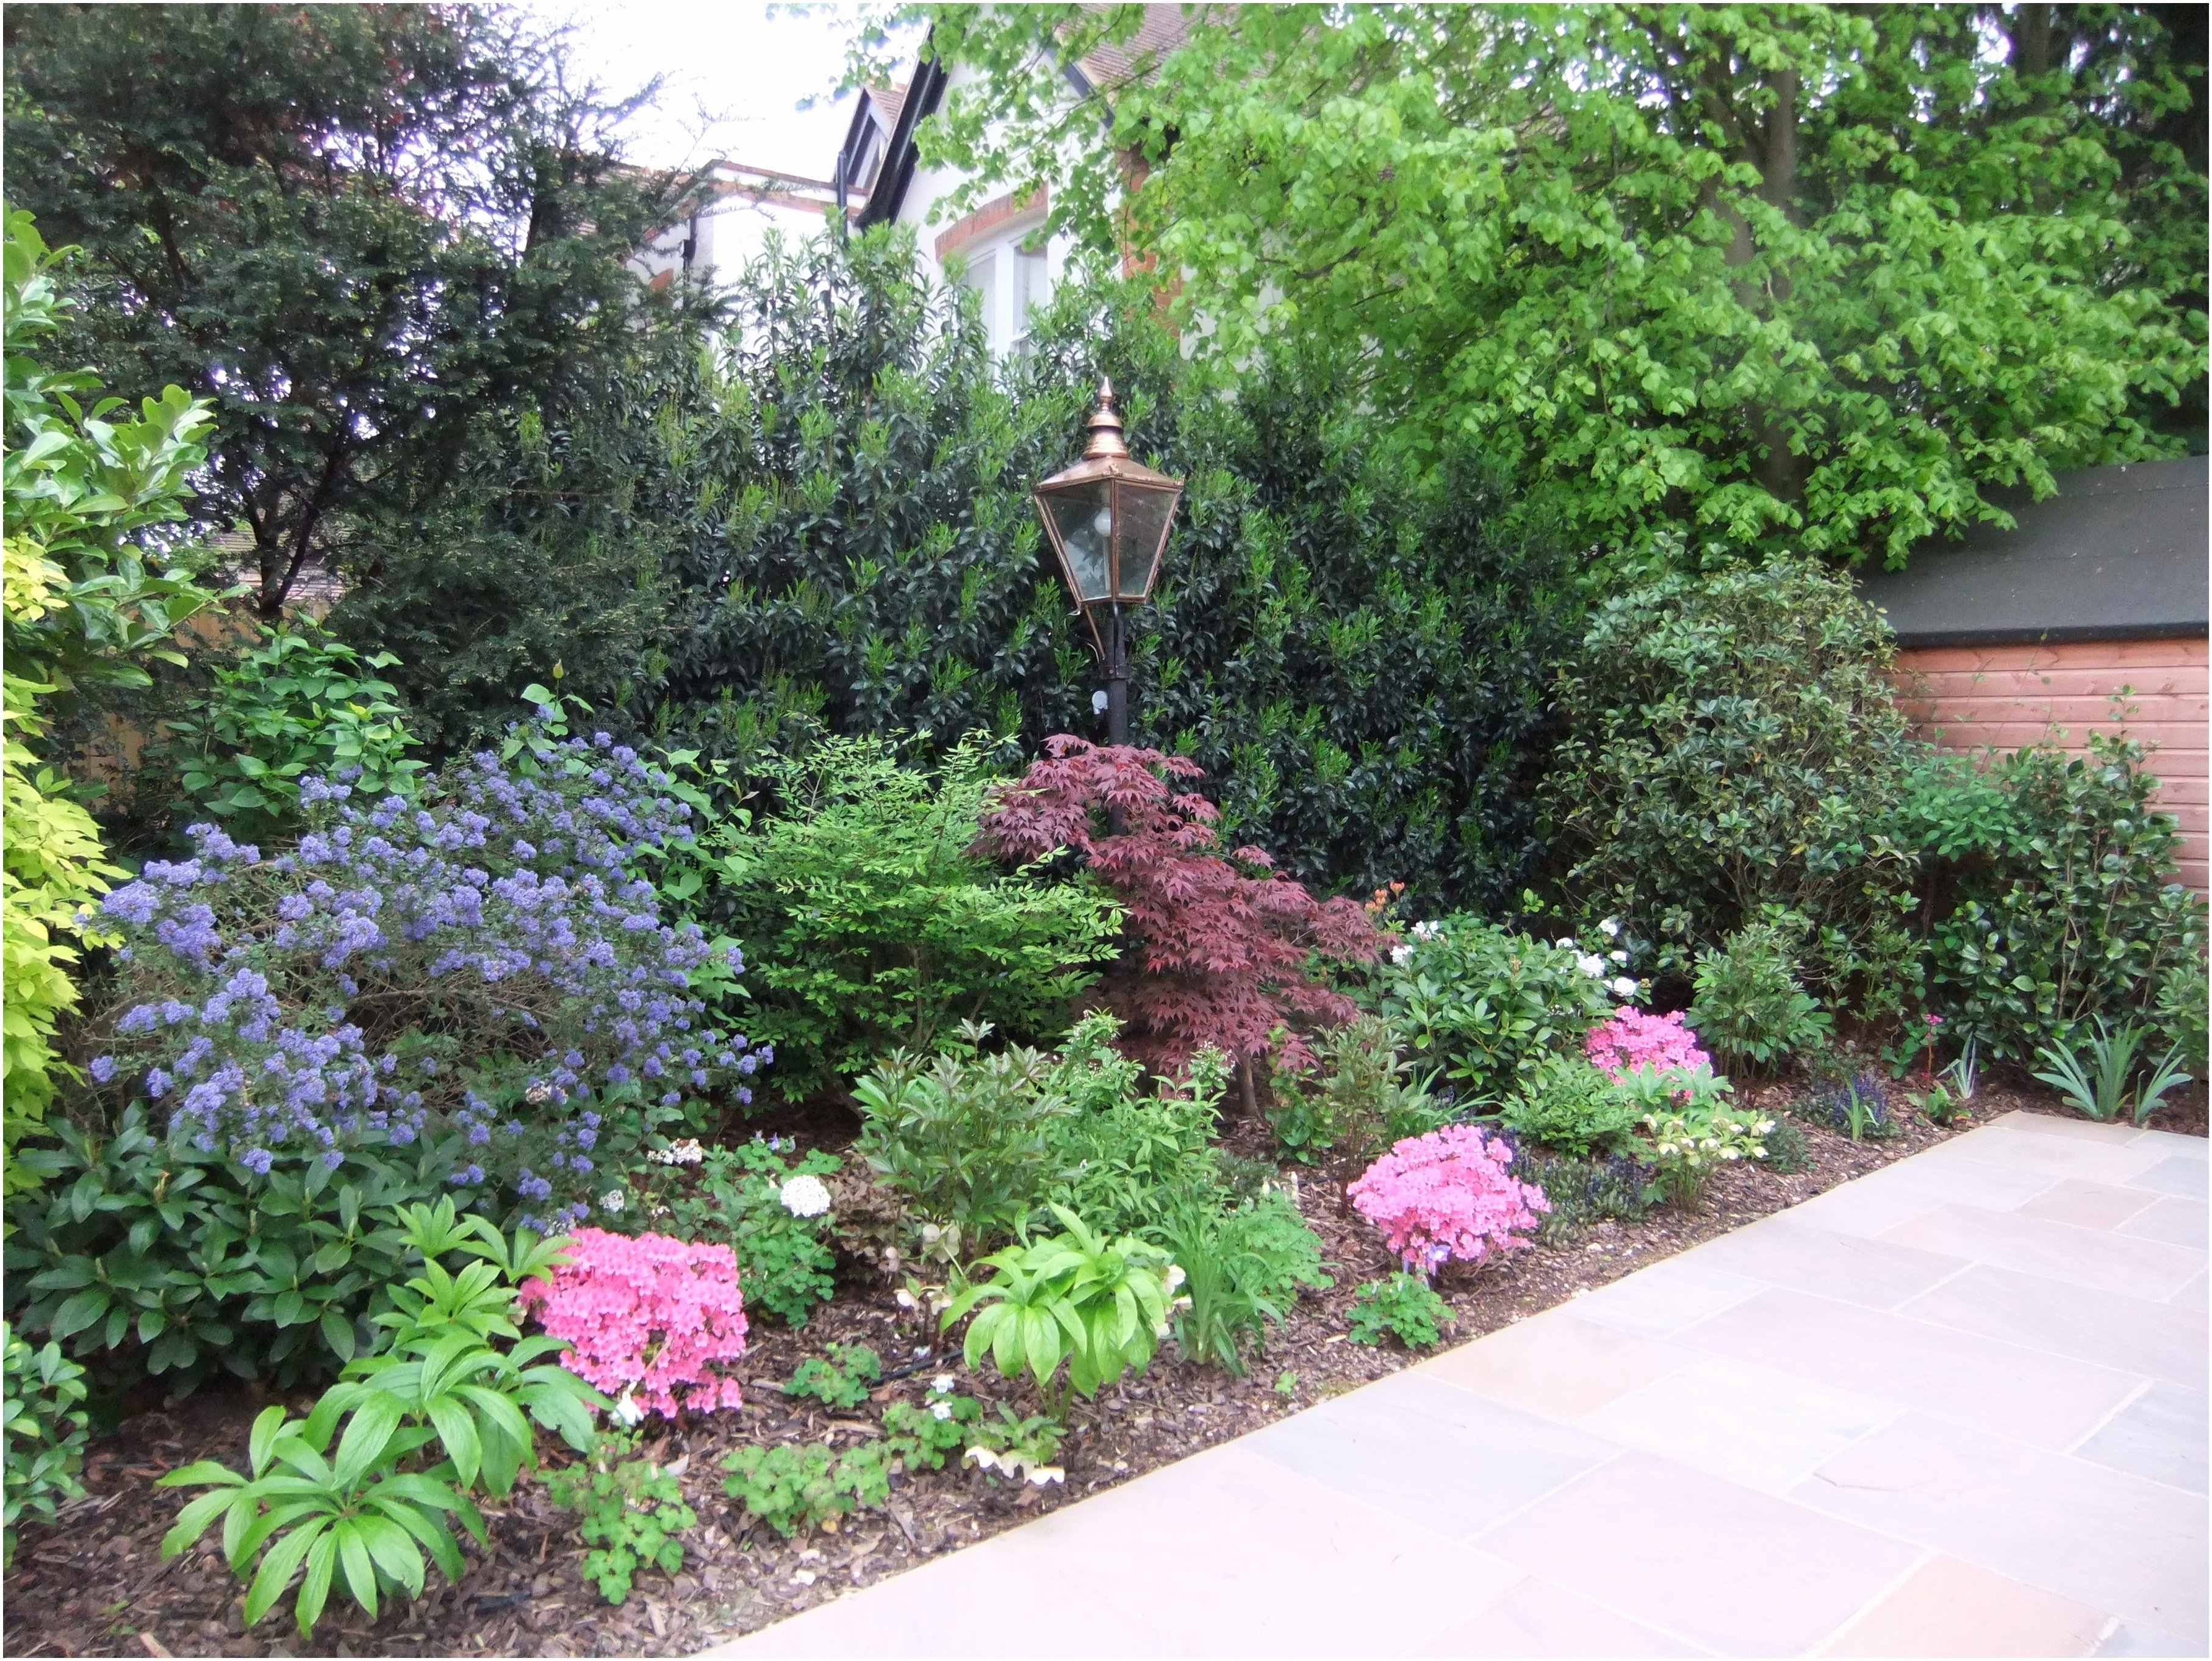
Creating a low-maintenance yet luxurious garden requires careful consideration of plant selection. Choosing the right plants can significantly reduce the time and effort needed for upkeep while maximizing visual appeal. Drought-tolerant varieties, in particular, are key to minimizing watering needs, a major contributor to garden maintenance. Furthermore, strategic use of ground covers and thoughtfully planned foliage textures contribute to a lush, effortlessly elegant space.
Drought-Tolerant Flowering Plants for a Luxurious Garden
The following table lists ten drought-tolerant flowering plants that are well-suited for creating a luxurious garden. These plants offer a variety of bloom times and mature sizes, allowing for diverse and continuous flowering throughout the growing season. Remember to consider your specific climate and soil conditions when making your final selections.
| Plant Name | Bloom Time | Mature Size | Color |
|---|---|---|---|
| Lavender (Lavandula angustifolia) | Summer | 2-3 ft tall, 2-3 ft wide | Purple, Blue |
| Russian Sage (Perovskia atriplicifolia) | Summer-Fall | 3-4 ft tall, 2-3 ft wide | Lavender-Blue |
| Coneflower (Echinacea purpurea) | Summer-Fall | 2-3 ft tall, 1-2 ft wide | Purple, Pink, White |
| Sedum (Sedum spp.) | Late Summer-Fall | Variable, depending on species | Pink, Red, White |
| Yarrow (Achillea millefolium) | Summer | 1-3 ft tall, 1-2 ft wide | White, Yellow, Pink, Red |
| Salvia (Salvia spp.) | Summer-Fall | Variable, depending on species | Purple, Blue, Red, Pink |
| Daylily (Hemerocallis spp.) | Summer | Variable, depending on species | Wide range of colors |
| Gaillardia (Gaillardia x grandiflora) | Summer-Fall | 1-2 ft tall, 1-2 ft wide | Red, Orange, Yellow |
| Potentilla (Potentilla fruticosa) | Summer-Fall | 2-3 ft tall, 2-3 ft wide | Yellow, Orange, White |
| Verbena (Verbena bonariensis) | Summer-Fall | 3-4 ft tall, 1-2 ft wide | Purple, Pink |
Low-Maintenance Ground Cover Plants
Ground cover plants are essential for suppressing weeds and adding visual texture to a luxurious garden. Their low-maintenance nature makes them ideal for busy gardeners who still desire a beautiful landscape. The following examples showcase diverse textures and color variations.
- Creeping Thyme (Thymus serpyllum): This aromatic herb offers a fine texture and a range of colors from pale green to deep purple, creating a fragrant and visually interesting carpet.
- Sedum (Sedum spp.): Certain Sedum varieties, like Sedum spurium, spread readily to form a dense mat, suppressing weeds and providing succulent texture and varying colors, including green, red, and purple.
- Bugleweed (Ajuga reptans): Bugleweed features attractive foliage in shades of green, bronze, and purple, forming a dense ground cover that effectively smothers weeds.
- Sweet Woodruff (Galium odoratum): This delicate ground cover offers a fine texture and delicate white flowers in spring, spreading gently to create a lush carpet.
- Lilyturf (Liriope muscari): This grass-like plant offers a more structured texture and comes in various shades of green and purple, creating a refined ground cover suitable for more formal garden styles.
Designing a Border with Varied Foliage Textures
Creating visual interest in a garden border relies heavily on the interplay of textures. Combining plants with contrasting textures prevents monotony and enhances the overall aesthetic. A successful border will use a combination of fine, medium, and coarse textures for a balanced and visually appealing design.
For example, a border could incorporate:
* Fine Texture: Creeping Thyme (Thymus serpyllum), providing a delicate, almost velvety texture.
* Medium Texture: Lavender (Lavandula angustifolia), offering a more structured texture with its upright stems and small leaves.
* Coarse Texture: Russian Sage (Perovskia atriplicifolia), featuring larger, coarser leaves and a more substantial overall form.
This combination creates a balanced visual flow, with the fine texture providing a soft backdrop, the medium texture adding structure, and the coarse texture providing visual interest and height. The principle of visual contrast is key; the differing textures prevent the border from appearing flat or monotonous. This principle ensures that the eye is drawn across the border, appreciating the varied textures and creating a more dynamic and luxurious appearance.
Creating a Water-Wise Irrigation System

Efficient irrigation is crucial for a thriving, low-maintenance luxurious garden. Choosing the right system can significantly reduce water waste, saving you money and contributing to responsible water usage. Drip irrigation, in particular, offers numerous advantages over traditional sprinkler systems for creating a lush, yet easily managed, landscape.
Drip Irrigation Advantages over Sprinkler Systems
Selecting the appropriate irrigation method is paramount for a low-maintenance garden. Drip irrigation consistently outperforms traditional sprinkler systems in several key areas, leading to a healthier garden with less effort.
- Targeted Water Delivery: Drip irrigation delivers water directly to the roots of plants, minimizing water loss through evaporation and runoff. Sprinkler systems, conversely, often waste water by watering the surrounding soil, pathways, and even the foliage, leading to fungal diseases.
- Reduced Water Consumption: By precisely targeting water to plant roots, drip irrigation significantly reduces overall water consumption compared to sprinkler systems, which can lose a substantial portion of water to evaporation, especially in hot, windy conditions. This translates to lower water bills and a smaller environmental footprint.
- Improved Plant Health: Consistent, precise watering at the root level promotes healthier, stronger plant growth. Drip irrigation prevents overwatering or underwatering, leading to fewer plant diseases and stress. Sprinklers can lead to inconsistent watering and potentially damage delicate plants.
- Weed Suppression: The targeted watering of drip irrigation keeps the surrounding soil drier, discouraging weed growth. Sprinkler systems, on the other hand, often water weeds along with the plants, leading to increased weed maintenance.
- Ease of Maintenance: Drip irrigation systems generally require less maintenance than sprinkler systems. They are less prone to clogging and require fewer repairs. Sprinklers, with their moving parts, can be more prone to malfunction.
Installing a Simple Drip Irrigation System
Installing a basic drip irrigation system is a manageable DIY project. Careful planning and the right materials are key to success.
Materials Needed: A simple system requires a water source (hose bib), a pressure regulator (to prevent damage to delicate plants), a filter (to prevent clogging), drip tubing, emitter tubing, end caps, connectors, and stakes.
Installation Steps:
- Plan the layout: Determine the placement of your drip lines based on plant locations and spacing. Consider the length of tubing needed for each plant.
- Connect the components: Connect the pressure regulator and filter to the water source. Then, connect the main drip line to the filter.
- Lay the drip tubing: Lay the main drip tubing along the garden bed, securing it with stakes. Ensure a gentle slope to prevent water pooling.
- Attach emitter tubing: Connect the emitter tubing to the main drip line at appropriate intervals, ensuring each plant receives adequate water.
- Install emitters: Insert emitters into the emitter tubing at each plant location. Select emitters with appropriate flow rates for your plants’ water needs.
- Test the system: Turn on the water and check for leaks. Adjust emitter placement and flow rates as needed to ensure even water distribution.
Diagram of a Drip Irrigation System
The following describes a diagram of a drip irrigation system for a small, rectangular garden bed (approximately 4ft x 8ft).
The diagram shows a rectangular garden bed. A water source (hose bib) is connected to a pressure regulator and a filter. From the filter, a main drip line (1/2 inch diameter) runs along the length of the garden bed (8ft). Along this main line, shorter lengths of emitter tubing (1/4 inch diameter) branch off at approximately 12-inch intervals. Each emitter tubing segment terminates with a low-flow emitter (approximately 0.5 gallons per hour) placed directly at the base of a plant. End caps are used to seal the ends of all tubing lines. The main drip line and emitter tubing are secured to the ground using stakes. The diagram clearly illustrates the flow of water from the source to each individual plant, demonstrating the efficient and targeted water delivery of a drip irrigation system.
Mulching Techniques for Weed Suppression and Aesthetics

Mulching is a crucial aspect of creating a low-maintenance, yet luxurious garden. It not only suppresses weeds, conserving water and reducing the need for constant weeding, but also enhances the overall aesthetic appeal of your garden beds. By carefully selecting and applying mulch, you can create a visually stunning and effortlessly maintained landscape.
Different mulches offer varying benefits and drawbacks. The best choice depends on your specific needs, budget, and aesthetic preferences. Consider factors such as water retention, weed suppression effectiveness, and the overall visual impact when making your selection.
Mulch Type Comparison
The following table compares several popular mulch types, highlighting their advantages and disadvantages.
| Mulch Type | Pros | Cons | Aesthetic Effect |
|---|---|---|---|
| Wood Chips | Excellent weed suppression, good water retention, readily available, relatively inexpensive. | Can decompose relatively quickly, requiring replenishment, may harbor pests or diseases if not properly sourced. | Natural, rustic look; various sizes and colors available, from light brown to dark brown. |
| Shredded Bark | Excellent weed suppression, good water retention, aesthetically pleasing, long-lasting. | More expensive than wood chips, may need occasional replenishment depending on the type of bark and climate. | More refined and uniform look than wood chips; available in various colors, from reddish-brown to dark brown. |
| Gravel | Excellent weed suppression, long-lasting, good drainage, requires minimal maintenance. | Poor water retention, can heat up significantly in sunny areas, may not be suitable for all plant types. | Modern, clean look; available in various colors and sizes, from small pebbles to larger stones. Can create a very formal or informal look depending on the design. |
Effective Mulch Application
Proper application of mulch is key to maximizing its benefits. Applying mulch too thinly will not effectively suppress weeds, while applying it too thickly can smother plants and create other issues. Maintaining appropriate spacing around plant stems is crucial to avoid rot.
The ideal depth for most mulches is generally 2-3 inches. Spread the mulch evenly around plants, leaving a small gap (about 1-2 inches) between the mulch and the plant stems to prevent moisture buildup and rot. For newly planted seedlings, consider a slightly thinner layer initially.
Visual Impact of Mulch Color and Texture
The color and texture of mulch significantly impact the overall aesthetic of your garden. Consider how different mulches complement your plants and hardscape elements.
For example, dark-colored mulches like dark brown shredded bark can create a dramatic and sophisticated look, while lighter-colored mulches like light-colored gravel can brighten up a shady area. The texture of the mulch also plays a role; coarse wood chips offer a rustic feel, while fine shredded bark provides a more refined look. Experiment with contrasting textures and colors to create visual interest and depth in your garden design. A combination of mulches can be used to achieve a desired look. For instance, using gravel pathways bordered by wood chips creates a beautiful contrast.
Designing Pathways and Hardscaping Elements
Creating inviting and durable pathways and hardscaping features is crucial for a luxurious, low-maintenance garden. These elements not only enhance the garden’s aesthetic appeal but also provide practical functionality, guiding movement and creating distinct zones within the space. Careful selection of materials and thoughtful design ensures both beauty and longevity.
Hardscaping Materials for Pathways
Choosing the right materials for pathways is key to achieving a balance between durability, aesthetics, and ease of maintenance. The following options offer various levels of visual impact and longevity, suitable for different garden styles.
- Pavers: Pavers, available in a wide range of materials (stone, brick, concrete), offer excellent durability and versatility. Their modular nature allows for intricate patterns and easy repairs or replacements. Aesthetically, they can range from rustic charm to sleek modernity depending on the material and layout chosen.
- Gravel: Gravel pathways are cost-effective and provide a natural, permeable surface. Their durability depends on the type and size of gravel used; larger stones are more resilient. Gravel pathways offer a relaxed, informal aesthetic, ideal for cottage gardens or naturalistic landscapes.
- Stepping Stones: Stepping stones, often made of natural stone or concrete, create a more informal and whimsical pathway. Durability varies depending on the material and thickness. They are aesthetically pleasing and can be arranged in a variety of patterns to complement the garden’s design.
- Flagstone: Flagstone, a type of natural stone, offers a rustic and elegant look. Its durability is high, especially with proper installation. The irregular shapes and natural variations in color and texture create a unique and visually interesting pathway.
- Concrete: Concrete pathways are highly durable and relatively inexpensive. They can be poured into various shapes and patterns, offering flexibility in design. While durable, concrete pathways can appear less natural than other options unless stamped or colored to mimic other materials.
Creating a Curved Pathway with Pavers
Constructing a curved pathway using pavers involves several steps to ensure both aesthetic appeal and functionality. Proper drainage and edging are essential for long-term maintenance.
- Planning and Design: Sketch the desired pathway’s curve, noting its width and overall length. Consider the surrounding landscape and plant placement.
- Site Preparation: Clear the area of vegetation and debris. Excavate the soil to a depth of approximately 4-6 inches, creating a level base for the pavers. Ensure proper drainage by sloping the base slightly away from any structures.
- Edging Installation: Install landscape edging along the perimeter of the pathway to prevent the pavers from shifting or spreading. This can be metal, plastic, or even natural stone.
- Base Material: Add a layer of compacted gravel or crushed stone (about 2-3 inches) to provide a stable and well-drained base for the pavers. This prevents settling and ensures even surface.
- Paver Installation: Begin laying pavers, starting at a central point and working outwards. Use a rubber mallet to gently tap the pavers into place, ensuring they are level and evenly spaced. Maintain the curved shape by using a flexible measuring tape or string as a guide.
- Joint Filling: Once the pavers are in place, fill the joints with polymeric sand or gravel to prevent weed growth and stabilize the pathway.
Designing a Small Patio Area Using Natural Stone
A small patio area crafted from natural stone creates a beautiful and functional outdoor living space. The choice of stone, its arrangement, and the construction techniques all contribute to the overall visual impact.
Natural stone, such as flagstone or bluestone, offers a timeless elegance. The irregular shapes and natural variations in color and texture add character and visual interest. The construction process involves preparing a level base, similar to the pathway construction, followed by carefully arranging and setting the stones. A layer of compacted gravel provides a stable foundation and ensures proper drainage. Larger stones can be used for the main patio surface, while smaller stones or gravel can fill gaps and create a natural, flowing design. The visual impact is one of relaxed sophistication, blending seamlessly with the surrounding garden. The natural tones and textures of the stone create a calm and inviting atmosphere, perfect for outdoor relaxation or entertaining.
Choosing the Right Garden Furniture
Selecting the right garden furniture is crucial for achieving a luxurious and low-maintenance outdoor space. The pieces you choose should not only enhance the aesthetic appeal of your garden but also withstand the elements and require minimal upkeep. Consider the overall style of your garden and your personal preferences when making your selections.
Styles of Luxurious Garden Furniture
The style of your garden furniture should complement the overall design of your outdoor space. Choosing pieces that are both beautiful and practical is key to creating a truly luxurious and low-maintenance garden. Here are three styles that often achieve this balance:
- Wrought Iron: Wrought iron furniture offers a classic, elegant look. Its intricate designs add a touch of sophistication to any garden. While it can be heavy, wrought iron is incredibly durable and weather-resistant, requiring minimal maintenance beyond occasional cleaning with soapy water and a wire brush to remove rust. A protective coat of paint or sealant can further extend its lifespan and enhance its appearance. The dark, often black, finish complements many garden styles, particularly those with a formal or traditional feel.
- Teak Wood: Teak is a naturally durable hardwood known for its rich golden brown color and weather resistance. Teak furniture exudes a sense of timeless elegance and seamlessly integrates into both modern and traditional garden settings. Minimal maintenance is required, typically involving occasional cleaning with a mild soap solution and water. While teak naturally weathers to a silvery-gray patina, regular oiling can maintain its original rich color.
- Aluminum with Powder Coating: Aluminum garden furniture offers a lightweight yet sturdy option. Its sleek, modern aesthetic makes it suitable for contemporary garden designs. Powder-coated aluminum is highly resistant to rust and corrosion, making it exceptionally low-maintenance. Regular cleaning with soap and water is usually sufficient. The powder coating comes in a variety of colors, allowing for customization to match your garden’s palette. This option is particularly suitable for coastal gardens where salt air can be corrosive to other materials.
Features to Consider When Selecting Outdoor Furniture
When choosing furniture for a low-maintenance garden, several key features should be prioritized. These features will ensure your furniture remains beautiful and functional for years to come with minimal effort.
- Weather Resistance: Opt for materials that are naturally weather-resistant or have been treated to withstand the elements. This minimizes the need for frequent repairs or replacements due to sun damage, rain, or snow. Consider materials like teak, powder-coated aluminum, or weather-resistant wicker.
- Easy Cleaning: Choose furniture with smooth, non-porous surfaces that are easy to wipe clean. Avoid intricate designs or materials that trap dirt and debris. This simplifies maintenance and keeps your furniture looking its best.
- Durability: Invest in sturdy, well-constructed furniture that can withstand regular use and exposure to the elements. Look for furniture with strong frames and high-quality materials. Durable furniture will require fewer repairs and last longer.
- Comfort: While low maintenance is important, comfort shouldn’t be sacrificed. Choose furniture with comfortable cushions and seating that is suitable for your needs and the climate. Consider adding weather-resistant cushions or choosing furniture with built-in comfort features.
- Style and Aesthetics: The furniture should complement the overall design and aesthetic of your garden. Consider the color, style, and size of the pieces to ensure they enhance the look and feel of your outdoor space. Choose pieces that reflect your personal style and create a cohesive look.
Comfortable and Stylish Seating Area for a Small Garden
For a small garden, a cozy and stylish seating area can be created using a pair of teak wood armchairs and a small, round teak wood coffee table. The armchairs should be placed facing each other, a few feet apart, allowing for comfortable conversation. The coffee table is positioned between the armchairs, providing a surface for drinks and small decorative items. To add a touch of luxury, plush, weather-resistant cushions in a neutral color, such as cream or beige, can be added to the armchairs. This arrangement creates an intimate and inviting space without overwhelming the small garden. The natural beauty of the teak wood complements most garden styles, and the minimal maintenance required ensures the area remains stylish and relaxing with minimal effort.
Incorporating Architectural Elements
Architectural elements can elevate a low-maintenance garden from simply functional to truly luxurious. Strategic placement and careful selection of these features can dramatically enhance the overall aesthetic appeal and create focal points that draw the eye and invite relaxation. The key is to choose elements that complement the existing landscape and enhance, rather than detract from, the overall low-maintenance design.
Adding architectural elements provides structure, visual interest, and a sense of sophistication to even the simplest garden designs. These features can also serve practical purposes, such as providing shade or creating defined spaces within the garden. The right elements will add layers of depth and texture, transforming your outdoor space into a personal oasis.
Examples of Architectural Elements Enhancing Garden Design
The careful incorporation of architectural features can significantly impact the luxurious feel of a low-maintenance garden. Three excellent examples that offer both visual appeal and practicality are pergolas, fountains, and retaining walls.
- Pergolas: A pergola, with its elegant latticework and climbing plants, creates a shaded retreat and adds a touch of romance. Imagine a pergola draped with wisteria or climbing roses, offering a fragrant and visually stunning focal point. The open structure allows sunlight to filter through, creating dappled shade, while the vertical lines of the structure add height and visual interest to the garden.
- Fountains: The gentle sound and visual movement of a fountain add a sense of tranquility and sophistication. A small, elegantly designed fountain, perhaps made of stone or metal, can become a central feature, drawing the eye and creating a calming atmosphere. The reflective surface of the water also adds a dynamic element to the garden, reflecting light and enhancing the overall beauty.
- Retaining Walls: Retaining walls, particularly those constructed from natural stone or brick, can create defined levels in the garden, adding visual interest and functionality. They can be used to create terraces, define pathways, or simply to add height and structure to a flat area. A well-designed retaining wall can serve as a backdrop for planting, showcasing the beauty of flowering shrubs or groundcovers.
Benefits of Vertical Gardening in Small Spaces
Vertical gardening, utilizing trellises and climbing plants, is particularly beneficial in smaller garden spaces. This technique maximizes the use of available vertical space, allowing for a greater variety of plants and a more lush appearance without sacrificing valuable ground area. The strategic use of vertical elements also adds visual depth and interest, creating a sense of spaciousness that belies the actual size of the garden.
Designing a Small Vertical Garden
A small vertical garden can be easily created using a simple trellis and a selection of climbing plants. For example, a 6ft x 2ft trellis constructed from pressure-treated timber could support a variety of climbing plants.
- Trellis Construction: The trellis could be built using 2×2 inch pressure-treated timber, creating a simple grid pattern with cross-supports for added strength. The timber should be stained or sealed to protect it from the elements and enhance its aesthetic appeal.
- Plant Selection: Clematis, with its vibrant blooms and diverse varieties, is an excellent choice for a vertical garden. Consider pairing a clematis with a less vigorous climber such as honeysuckle, which offers fragrant flowers and a contrasting texture. For a more modern look, consider using climbing hydrangeas for a bold, textured effect.
- Planting and Maintenance: Plant the climbers at the base of the trellis, ensuring adequate spacing between them. Regular watering and fertilization will promote healthy growth and abundant blooms. Annual pruning will help maintain the shape and size of the plants, preventing them from becoming overgrown.
Maintaining a Luxurious Look Throughout the Seasons
A low-maintenance garden doesn’t mean sacrificing beauty; with careful planning and seasonal adjustments, your outdoor space can remain visually stunning year-round. By understanding the growth cycles of your plants and employing appropriate maintenance techniques, you can ensure a continuous display of color, texture, and form, regardless of the time of year. This involves thoughtful plant selection, strategic pruning, and preparation for the harsher conditions of winter.
Maintaining a visually appealing garden throughout the year requires a proactive approach that considers the changing seasons. This includes selecting plants that offer diverse blooming periods and textures, adapting your watering schedule, and undertaking necessary pruning and protection measures. By understanding the needs of your plants and adjusting your care accordingly, you can ensure your garden remains a source of beauty and enjoyment throughout the year.
Seasonal Planting and Pruning Techniques
Successful seasonal transitions in your garden rely on understanding the specific needs of each plant. Spring planting focuses on adding annuals and bedding plants for vibrant color, while summer care concentrates on regular deadheading to encourage further blooms. Autumn brings opportunities for planting bulbs for spring displays and pruning perennials to remove dead or damaged growth. This prevents disease and encourages stronger growth the following year. Careful pruning also helps maintain the desired shape and size of shrubs and trees, preventing overcrowding and maintaining a clean, luxurious aesthetic. For example, removing spent blooms on roses in summer encourages a second flush of flowers, while pruning hydrangeas in late winter ensures abundant blooms in the following summer.
Late-Season Flowering Plants
Extending the bloom period into autumn adds depth and interest to your garden landscape. Choosing plants that flower late in the season provides a vibrant display even as temperatures begin to drop.
- Sedum (Stonecrop): These succulents offer clusters of late-blooming flowers in shades of pink, red, and white. They are incredibly drought-tolerant and low-maintenance, perfect for a luxurious, water-wise garden. Their unique foliage texture also adds visual interest even after flowering.
- Aster: Asters are known for their profusion of daisy-like blooms in various colors, including purple, pink, and white. They are relatively low-maintenance and attract pollinators, adding to the garden’s biodiversity and charm. They thrive in full sun to partial shade.
- Chrysanthemum: These classic autumn flowers come in a wide range of colors and forms, offering a vibrant display that extends well into fall. They are relatively easy to grow and maintain, requiring well-drained soil and plenty of sunlight.
- Helenium: These cheerful daisy-like flowers are available in shades of yellow, orange, and red, adding warmth to the autumn garden. They are relatively hardy and adaptable, tolerating a range of soil conditions.
- Coneflower (Echinacea): While some coneflower varieties bloom earlier, many offer late-season blooms, providing a long period of color. They are known for their drought tolerance and attract beneficial insects. Their seed heads also provide winter interest for birds.
Preparing a Low-Maintenance Garden for Winter
Preparing your garden for winter is crucial for protecting your plants and maintaining the overall aesthetic. This involves several key steps to ensure your garden survives the harsh conditions and remains attractive even in the dormant season.
Winter preparation begins with a thorough cleanup of fallen leaves and debris. This prevents the build-up of moisture that can lead to fungal diseases. Next, tender plants should be protected from frost either by moving them indoors or covering them with frost blankets or other protective materials. Evergreen shrubs and trees may benefit from a light watering before the ground freezes to help them withstand the cold. Finally, any damaged or dead plant material should be removed and disposed of properly to prevent the spread of disease. Leaving some seed heads on certain plants can provide winter interest and food for birds, adding to the overall beauty and ecological balance of your garden.
Pest and Disease Management in a Low-Maintenance Garden
Maintaining a luxurious low-maintenance garden requires proactive pest and disease management. Ignoring these issues can quickly negate your efforts, leading to unhealthy plants and a less aesthetically pleasing space. A preventative approach, combined with organic control methods, is key to achieving a thriving and beautiful garden without excessive intervention.
Common Garden Pests and Diseases and Their Control
Preventing pest and disease problems is far easier than dealing with infestations or outbreaks. Early detection and swift action are crucial for minimizing damage and protecting the overall health of your garden. The following Artikels three common garden issues, preventative strategies, and organic solutions.
- Aphids: These tiny sap-sucking insects can quickly infest plants, causing stunted growth and leaf distortion. Preventative measures include regularly inspecting plants, ensuring good air circulation (avoid overcrowding), and attracting beneficial insects like ladybugs which prey on aphids. Organic control methods include using insecticidal soap or neem oil, applying them according to product instructions. A strong spray of water can also dislodge aphids from plants.
- Powdery Mildew: This fungal disease appears as a white, powdery coating on leaves, hindering photosynthesis and weakening plants. Prevention involves ensuring good air circulation, avoiding overhead watering (which creates humid conditions favorable to mildew), and choosing disease-resistant plant varieties. Organic control includes using a baking soda solution (1 tablespoon baking soda, ½ teaspoon liquid soap, 1 gallon water) sprayed on affected leaves. Removing and destroying severely infected leaves can also help limit the spread.
- Root Rot: Caused by various fungi thriving in excessively wet soil, root rot leads to wilting, yellowing leaves, and ultimately plant death. Prevention focuses on well-drained soil, avoiding overwatering, and providing adequate spacing between plants to allow for air circulation around roots. Organic control involves improving soil drainage by adding compost or other organic matter, ensuring proper watering techniques, and removing affected plants to prevent further spread.
Importance of Disease-Resistant Plant Varieties
Selecting disease-resistant plant varieties is a cornerstone of low-maintenance gardening. These plants are inherently less susceptible to common diseases, reducing the need for frequent treatments and interventions. This not only saves time and effort but also minimizes the use of pesticides, contributing to a healthier environment. For example, choosing specific rose varieties known for their resistance to black spot will significantly reduce the need for fungicide applications. Similarly, selecting disease-resistant tomato varieties can minimize the impact of blight. Investing in these plants upfront translates to long-term savings in time, effort, and resources.
Creating a Simple Compost Bin
Composting garden waste is a vital aspect of sustainable and low-maintenance gardening. Compost enriches the soil, improving drainage, aeration, and nutrient content, creating a healthier environment for your plants and reducing the need for chemical fertilizers. A simple compost bin can be constructed using readily available materials.
- Choose a Location: Select a shady area with good drainage. A spot near your garden is ideal for easy access.
- Gather Materials: You can use pallets, wire mesh, or even repurposed wooden crates to build the bin’s structure. Ensure the sides are high enough to contain the compost.
- Assemble the Bin: Construct a bin with three or four sides, leaving one side open for access. The structure should be sturdy enough to hold the compost and prevent it from spilling.
- Add Materials: Layer “green” materials (grass clippings, vegetable scraps) and “brown” materials (dried leaves, twigs) in a roughly equal proportion. Avoid adding meat, dairy products, or diseased plants.
- Maintain Moisture: Keep the compost consistently moist, like a damp sponge. Regularly turn the compost with a pitchfork or garden spade to ensure proper aeration.
- Harvest Compost: After several months (the time varies depending on factors like temperature and moisture), the compost will be dark, crumbly, and earthy-smelling. This is ready to be added to your garden beds.
Lighting for a Luxurious Evening Ambiance
Transforming your low-maintenance garden into a haven of evening luxury relies heavily on thoughtful lighting design. The right lighting not only enhances the beauty of your plants and hardscaping but also creates a welcoming and relaxing atmosphere for you and your guests to enjoy. By carefully selecting fixture types, placement, and color temperature, you can craft a truly magical nighttime experience.
The impact of outdoor lighting extends beyond mere illumination; it shapes the mood and ambiance of your garden. Different lighting fixtures and their strategic placement highlight key features, create focal points, and guide movement through the space. Choosing the right color temperature influences the overall feeling, from warm and inviting to cool and sophisticated.
Types of Outdoor Lighting Fixtures and Their Placement
Effective outdoor lighting involves a layered approach, combining various fixture types for optimal effect. Path lighting, for example, uses low-level fixtures to safely illuminate walkways and steps, preventing accidents while adding a touch of elegance. Uplighting directs light upwards, highlighting the architecture of trees, walls, or other structures, adding drama and depth to the landscape. Downlighting casts light downwards, ideal for illuminating patios or seating areas, creating a comfortable and inviting space. Spotlights, on the other hand, focus a concentrated beam of light on specific features, such as a beautiful sculpture or a water feature, drawing attention to these focal points. Finally, string lights offer a more casual and festive feel, perfect for adding a touch of whimsy to a pergola or fence. Consider the scale of your garden and the features you want to emphasize when selecting fixture types and placement. For instance, taller trees might benefit from uplighting, while smaller shrubs might be better suited to subtle path lighting.
Impact of Lighting Colors on Mood
The color temperature of your lighting significantly impacts the overall atmosphere. Warm white light (around 2700K-3000K) evokes a feeling of warmth, comfort, and intimacy, ideal for creating a cozy and inviting ambiance in a patio or seating area. This color temperature complements natural materials like wood and stone, enhancing their inherent beauty. In contrast, cool white light (around 5000K-6500K) creates a more modern and crisp atmosphere, lending a sense of sophistication and spaciousness. This is particularly effective in highlighting architectural features or modern landscaping elements. Consider using a mix of both warm and cool white light to create visual interest and contrast within your garden. For instance, warm white path lighting could lead to a patio area illuminated with cool white spotlights showcasing a water feature.
Lighting Plan for a Small Patio Area
Let’s imagine a small patio area, approximately 10ft x 10ft, adjacent to a low-maintenance garden. To create a welcoming and luxurious atmosphere, we can incorporate a combination of lighting types. Two warm white wall-mounted lanterns could flank the patio entrance, providing soft illumination and a sense of welcome. In the center of the patio, a hanging pendant light with a warm white bulb would offer ambient lighting, perfect for dining or relaxing. Low-voltage path lights lining the perimeter of the patio would guide movement and add a subtle glow to the surrounding plants. Finally, strategically placed spotlights could highlight a nearby specimen plant or a small water feature, adding visual interest and creating a focal point. This layered approach combines ambient, task, and accent lighting to create a balanced and inviting atmosphere. Remember to consider the height of the fixtures to ensure adequate illumination without creating harsh shadows.
FAQ Section
What are some good choices for low-maintenance flowering shrubs?
Consider potentilla, spirea, or hydrangea varieties known for their resilience and minimal pruning needs.
How often should I water my low-maintenance garden?
Deep, infrequent watering is best. Check soil moisture before watering and adjust frequency based on weather conditions.
What can I do to deter pests organically?
Introduce beneficial insects like ladybugs, use neem oil, or consider companion planting to repel pests naturally.
How do I choose the right mulch for my climate?
Consider your local climate and soil type. For dry climates, choose a mulch that retains moisture; for humid climates, opt for one that promotes drainage.